
Here is a story about a little application we implemented using Phoenix Live View, how its early implementation looked, and how it evolved when we noticed that the only existing LiveView module was holding too much code.
We will discuss in this article the options we have with Phoenix LiveView to separate responsibilities across different modules, and what we chose in our specific situation.
The problem
The application under study is the Elixir Web Console. It consists of only one screen that provides a way to enter a bit of Elixir code and send it to the server, and then the result of the computation is shown to the user. A list of issued commands with its corresponding output uses a significant area of the user interface. Another prominent part of this screen displays a sidebar, including the variables created through the session and some additional information.
We initially implemented this interface using a unique LiveView component. It was convenient to apply this simplistic approach since we were still learning LiveView. At that time, some of the mechanisms related to the separation of components were not clear upfront for us.
However, after some time adding more and more features, the number of events, the amount of template code inlined, and the overall amount of logic made our original Live View module very complicated. It was tough to read and reason about this module at that point.
Let’s enumerate what was going on in this module, which name was ConsoleView:
- It rendered the whole UI, including the history panel, the input to enter Elixir code, and the sidebar.
- It handled the event to submit the code, triggering a new render of the UI refreshing the history panel and the sidebar (because variables values could have changed).
- It handled a few keyboard events. This console has the feature to navigate through past commands using the DOWN and UP keys. Another feature is an autocomplete based on your variables and Elixir-provided functions using the TAB key.
- It handled the event triggered when users click on highlighted parts of the commands in the history panel, causing that relevant Elixir documentation to appear in the sidebar.
Weighing our options
According to the documentation of LiveView, we have three options to consider when deciding to split a LiveView module.
The first one is to divide the markup code using different template files. Given that we had all the HTML inlined in the LiveView module, we refactored our code, creating a bunch of template files. But we didn’t feel it was enough because our ConsoleView module still contained a lot of unrelated functions affecting different areas of the interface.
The second approach is to rely on live_render/3 instead of render/3. It allows you to create additional LiveView modules implementing individual parts of your user interface. However, it is important to note that the new LiveView modules will run in separate processes. This choice could be appropriate or not depending on your requirements, so it is crucial to consider if the isolation provided by having different processes is necessary. Most of the time, this is not the case.
So we arrive at the third option, which is to use live_component/3, a helper that provides us a way to implement parts of our LiveView module that are going to exist in specific Live Component modules. According to the documentation, these components “are a mechanism to compartmentalize state, markup, and events in LiveView.”. It offers a mechanism where we can place the event handling and template code that is related to portions of the user interface into more particular files. It was the perfect solution to break up our massive LiveView module.
Welcome Components
We decided to split the user interface into the following parts:
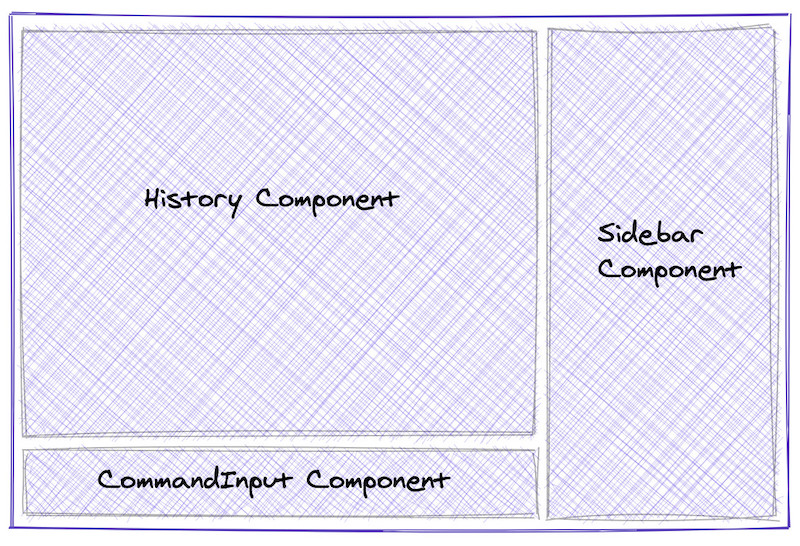
Note that the thought process is not far from what we do when working with a UI framework in Javascript. It is a matter of designing the user interface as a tree of components, each one being responsible for rendering that part and handling events.
Here is the markup invoked by the ConsoleLive module after introducing components. It looks very concise since it is only rendering specific parts and grouping them under very little HTML code. Do not expect to understand all the values passed to individual components; just get familiarized with how the parent template markup looks following this approach.
<div>
  <div>
    <%= live_component(@socket, HistoryComponent, output: @output, id: :history) %>
    <%= live_component(@socket, CommandInputComponent,
      history: @history, bindings: @sandbox.bindings, id: :command_input) %>
  </div>
  <%= live_component(@socket, SidebarComponent,
    sandbox: @sandbox, contextual_help: @contextual_help, suggestions: @suggestions)
  %>
</div>
Components come in many flavors. For example, in our application, the SidebarComponent ended up being a presentational component. It means it renders the sidebar but does not hold any state. In practice, the parent LiveView module is responsible for passing to the component all the values it needs to create the markup. In the component code, we have to implement a render function that receives the assigns including those values.
It results on a very concise module (assuming we have extracted the markup to a template file):
defmodule ElixirConsoleWeb.ConsoleLive.SidebarComponent do
  use Phoenix.LiveComponent

  def render(assigns) do
    Phoenix.View.render(ElixirConsoleWeb.ConsoleView, "sidebar.html", assigns)
  end
end
Regarding the HistoryComponent, it is not a mere presentational component, because there we have the code to handle click events on Elixir functions that were typed by the user in previous commands. As we would do with regular LiveView modules, we need to implement a clause of handle_event/3 pattern matching with the specific event name.
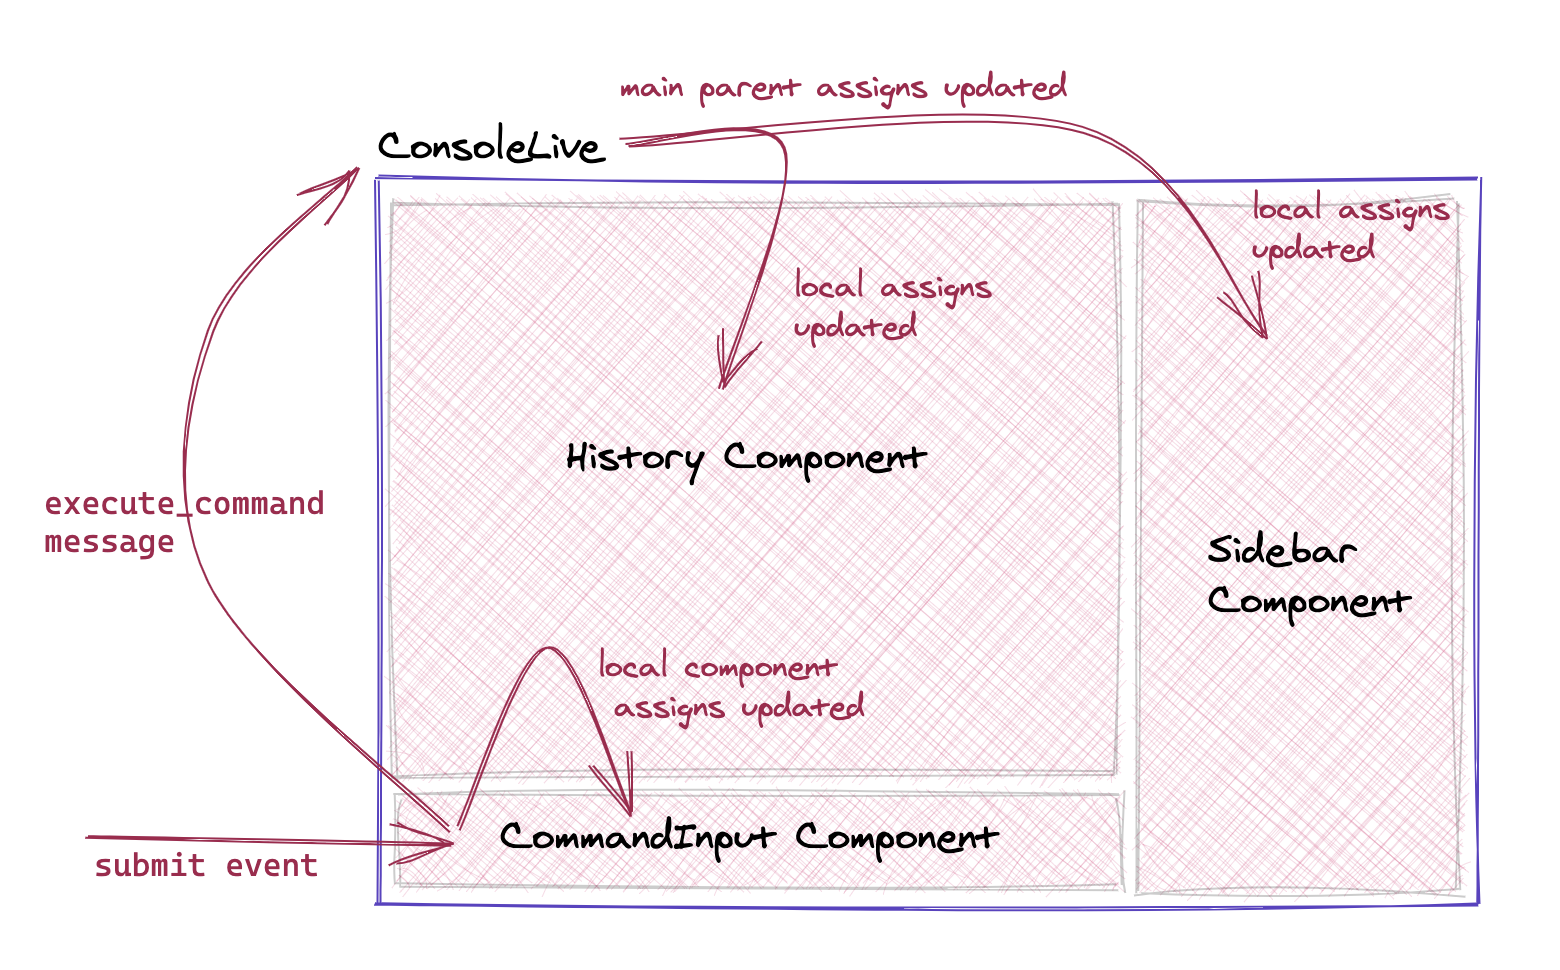
Please take into account that the parent LiveView has to pass an id value to each of its stateful components, the ones that will handle events. Those components have their state, which lives in their own socket.assigns. It takes their initial values from what it receives from the parent LiveView module, but it could be changed as long as it handles events, defining what the component renders over time.
However, in the context of our HistoryComponent, the click event won’t affect what it renders locally; the change will determine what is displayed on the SidebarComponent. Therefore, we are in need to communicate somehow to the parent module and cause a modification of its state (so it results in passing a new state to the sidebar part).
LiveView components can communicate with their parents and also other components through the process they share. Avoiding surprises, it just relies on the basic send primitive in Elixir. The following is the code in the HistoryComponent that sends a new-brand event to the main module when handling the click event.
defmodule ElixirConsoleWeb.ConsoleLive.HistoryComponent do
  use Phoenix.LiveComponent

  def render(assigns) do
    ...
  end

  def handle_event(
        "function_link_clicked",
        %{"func_name" => func_name, "header" => header, "doc" => doc, "link" => link},
        socket
      ) do
    send(
      self(),
      {:show_function_docs, %{func_name: func_name, header: header, doc: doc, link: link}}
    )

    {:noreply, socket}
  end
end
And we also need a handler in ConsoleLive to receive those messages. Note we use handle_info/2 instead of handle_event/3. The resulting code on the ConsoleLive side is almost logic-free, having as a specific responsibility updating the local socket.assigns based on the calculated values that it receives.
defmodule ElixirConsoleWeb.ConsoleLive do
  ...

  def handle_info({:show_function_docs, contextual_help}, socket) do
    {:noreply,
     socket
     |> assign(contextual_help: contextual_help)
     |> assign(suggestions: [])}
  end
end
You might think it isn’t worth to do this change, considering we used to have the code handling the click event in the main module, where we now have a handler for the event sent from the HistoryComponent. It is arguable in this case because the existing logic that handles the event is pretty straightforward. If we were in a situation where the events’ implementation takes a significant number of lines of code, the advantage of having all this code extracted from the parent module would have been more visible.
In any case, we still want to stick to the approach of handling the events in the component where they originate because it results in a better design from a conceptual point of view.
A more self-sufficient component
The remaining component is the CommandInputComponent, which is more interesting than the previous one. As always, it is in charge of rendering and handling events generated on a particular part of the user interface. In this case, it is handling the submit and keyboard events of the text input where the user writes Elixir code.
The submit event that sends the entered Elixir command to the server will trigger the delivery of a message from the component to the ConsoleLive module, as we discussed with click events in HistoryComponent. It is necessary because it needs to refresh the content of the rest of the sections of the screen.
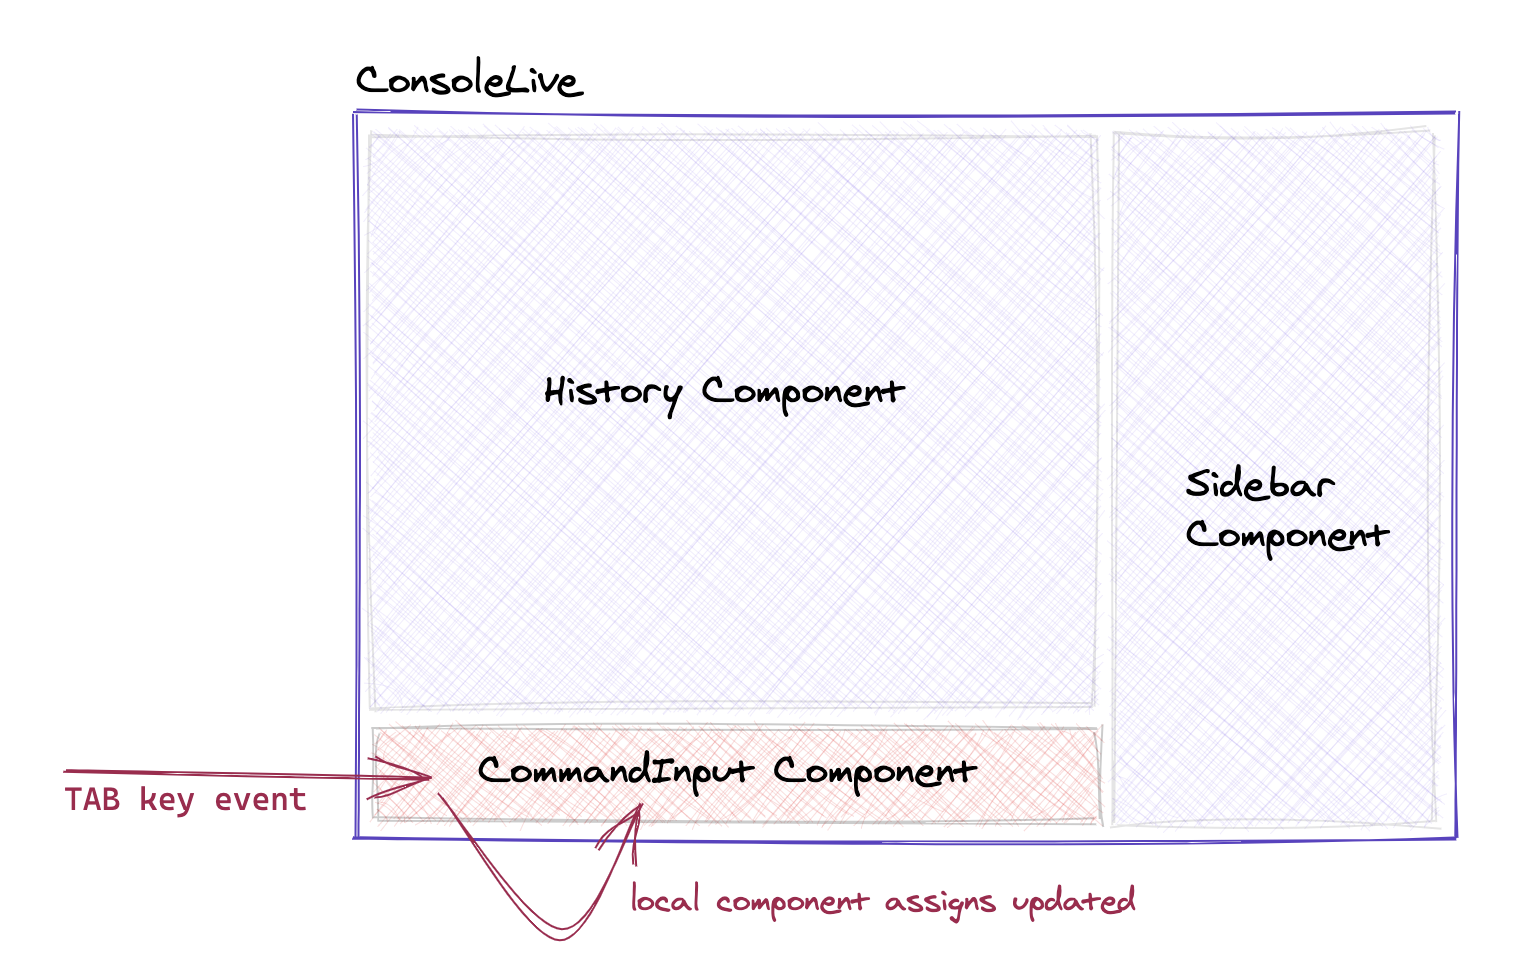
The exciting part happens with keyboard events. We have a local render function generating new markup for the text input field where the value and some HTML attributes were changed, and all this should be refreshed whenever the user hits the UP, DOWN, or TAB keys. We realized that those actions only caused changes in the interface in the region represented by the component, leading us to implement our event handlers with code that returned an updated socket.assigns (which, let’s repeat it, represents the local state of the component).
In those cases, we are not sending any event to the outside; the component can handle it and re-render the portion of the UI whenever it is appropriate. Doubtless, the move to place these bunch of related behavior in a dedicate module was propitious. It was a piece of code located in ConsoleLive that had almost no link with the rest of this module’s code. Therefore, it was reasonably easy to decouple. You can check how we implemented it by looking directly at the code in the repository of our project.
Moreover, there was a bunch of the original main module state that was moved to the input component. Here is how the code that initialize the state was reduced in ConsoleLive, resulting in a more manageable set of values in the context of this module.
defmodule ElixirConsoleWeb.ConsoleLive do
  ...

  # Before refactor
  # def mount(_session, socket) do
  #  {:ok,
  #   assign(
  #     socket,
  #     output: [],
  #     history: [],
  #     history_counter: 0,
  #     suggestions: [],
  #     input_value: "",
  #     caret_position: 0,
  #     contextual_help: nil,
  #     command_id: 0,
  #     sandbox: sandbox
  #   )}
  # end

  # After refactor
  def mount(_session, socket) do
    {:ok,
     assign(
       socket,
       output: [],
       history: [],
       suggestions: [],
       contextual_help: nil,
       command_id: 0,
       sandbox: sandbox
     )}
  end
end

defmodule ElixirConsoleWeb.ConsoleLive.CommandInputComponent do
  ...

  def mount(socket) do
    {:ok,
     assign(
       socket,
       history_counter: 0,
       input_value: "",
       caret_position: 0
     )}
  end
end
Conclusion
The idea of this article was to share our experience trying out Phoenix LiveView components. We are happy with the results because we feel we rebuilt the solution with a more solid foundation, where we will be more confident at the time of adding more features to the Elixir Console.
At the same time, it reveals how much the implementation of LiveView progresses in very little time. While working on the initial implementation of our application, we knew very little of components since it was something under development at that moment (a few months ago). It was refreshing to find new stuff in the LiveView toolkit that enabled us to improve the quality of our solution.
I hope our case serves as an example for other people trying or relying on LiveView to implement their applications. Most of the code was not presented in this article because it would require to understand the basis of our application domain (still, we wanted to show it without much simplification to keep it real). You can check out the full set of changes in the pull request where we implemented the changes.
References and Attributions
There is a section on the main page of the official Phoenix LiveView documentation that wonderfully explains the different ways to extract code from LiveView modules.
Besides, we can mention this early post on the topic as a useful resource: Introduction to Phoenix LiveView LiveComponents by Patrick Thompson
Header image credits: Photo by Jeremy Waterhouse from Pexels